REPORTS OVERVIEW
Pro Fund Accounting has an extensive reporting system. In each of the modules, there is a menu item that will show the reports that are in that module. All the reports in Pro Fund Accounting will run independently. You can have many reports open or the same report open many different times. For example, you can have two reports opened simultaneously in order to compare values. Another feature of Pro Fund Accounting is that many reports will have a quick example of what the report looks like and a description of the report.
When clicking on the Reports menu item in a particular module, the following window will appear (which will list different reports for different modules):

Reports that have the Information icon ![]() next to the name means that this report has saved parameters that you can see. To open a report, highlight the name by clicking on it, then click the Run selected report button to start the selected report. The report can also be ran by double-clicking on the report name. The following window will appear:
next to the name means that this report has saved parameters that you can see. To open a report, highlight the name by clicking on it, then click the Run selected report button to start the selected report. The report can also be ran by double-clicking on the report name. The following window will appear:
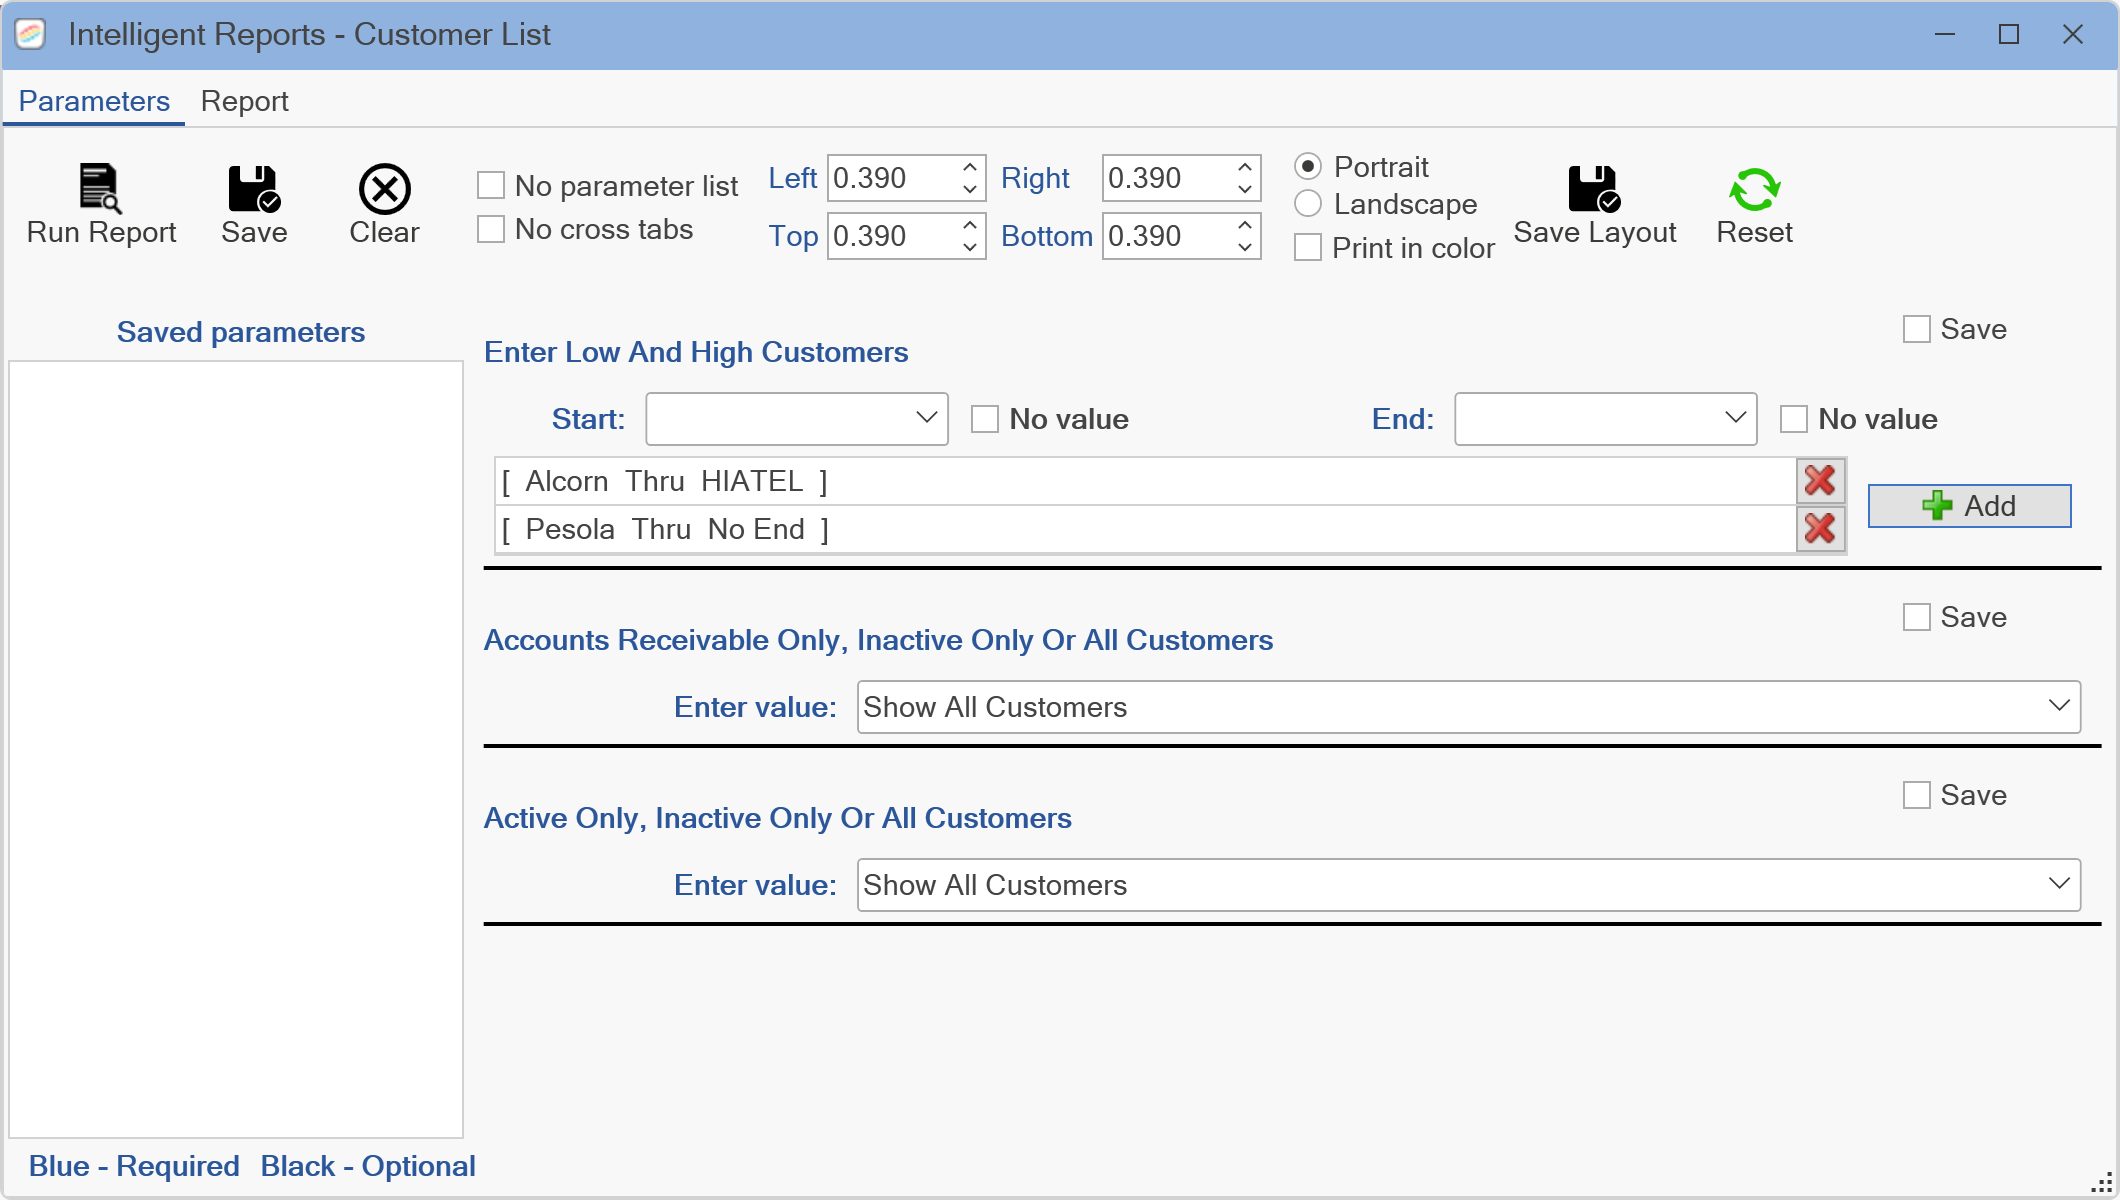
At the top of the window there is a Save button that will save all of the parameters that have been specified, including the Save check boxes. Pro Fund Accounting will ask for a Save parameter set name. Saved report parameter files have a 20-character file name limitation, so use abbreviations whenever possible and do not use special characters (e.g., "/" "-", etc.). Then click the Save button. The saved parameters name will appear to the left of the report parameters under the Saved parameters heading. Saved parameters can be deleted by clicking the X next to the name to be deleted. If you wish to share this parameter set with other users of Pro Fund Accounting, then click the Share button next to the saved parameters name. Other users of Pro Fund Accounting will then be able to use the saved parameters set but will not be able to modify it.
To load a parameters set, click on it. If the parameters set does not load, click the Clear button. This will clear all of the parameters that have been entered. Then click your desired saved parameters set to load. Most reports in Pro Fund Accounting will print the parameters used to create the report at the end of the report. This feature can be turned off by checking the box next to the No parameter list option at the top of the window. Many reports in Pro Fund Accounting will show a table with the relationship between two or more columns. This is known as a Cross Tab. This feature can be turned off by checking the box next to the No cross tabs option at the top of the window. The Show Group Tree option (if available) will show the results of the report on the left side of the report window.
There are margin settings at the top of the window. Also in this section, choose between Portrait, Landscape, or Print in color options. These can all be modified. Clicking the Save Layout button (or the Save button in the Layout section) will save these modifications so the next time you run the report it will automatically bring up all of the saved layout and print options. The Reset button will return the layout and print options to Pro Fund Accounting's default values. These print and layout options are saved for the current user only and cannot be shared.
There are two ways to enter dates - either by typing the dates in directly or by using the Calendar button.
For parameter fields that require a dollar amount, you do not need to enter commas or a dollar sign. For example, "$4,500.00" would be entered as "4500". For parameter fields that require a percentage, enter the number as a whole number with a decimal point (if needed). For example, "6.5%" would be entered as "6.5"; "25%" would be entered as "25"; ".8%" would be entered as ".8".
Some reports have a No value check box next to the parameter fields that ask for low and high dates or data. Checking this box indicates that you want all available information without any consideration of date or data ranges. For example, if you have a low and high date field and you check the No value box for both low and high date, Pro Fund Accounting will gather data from every date in the database. Consequently, if you check the No value box on the low date field but enter a high date, then you will see all of the data for every date up to the date entered in the high date field.
The large white boxes under low and high data or date fields display what was entered for these parameters. That data is shown AFTER you click the Add button. More than one set of parameters for the low and high data or date fields can be used for the report. If you want to remove data from these boxes, highlight the line you want to remove and click the X button.
After you have entered your parameter fields and have checked the Save check boxes next to the fields you want to save, then click the Save button at the top of the window. Only do this if you want to save the parameters entered for another time; otherwise, just run the report.
Parameters that require input will be shown in BLUE. Parameters that are optional will be shown in BLACK. Once all of the parameters, layout, and print options are specified, click the Run Report button in the top left corner of the window or click the Report menu tab at the top of the window. The following window will appear:
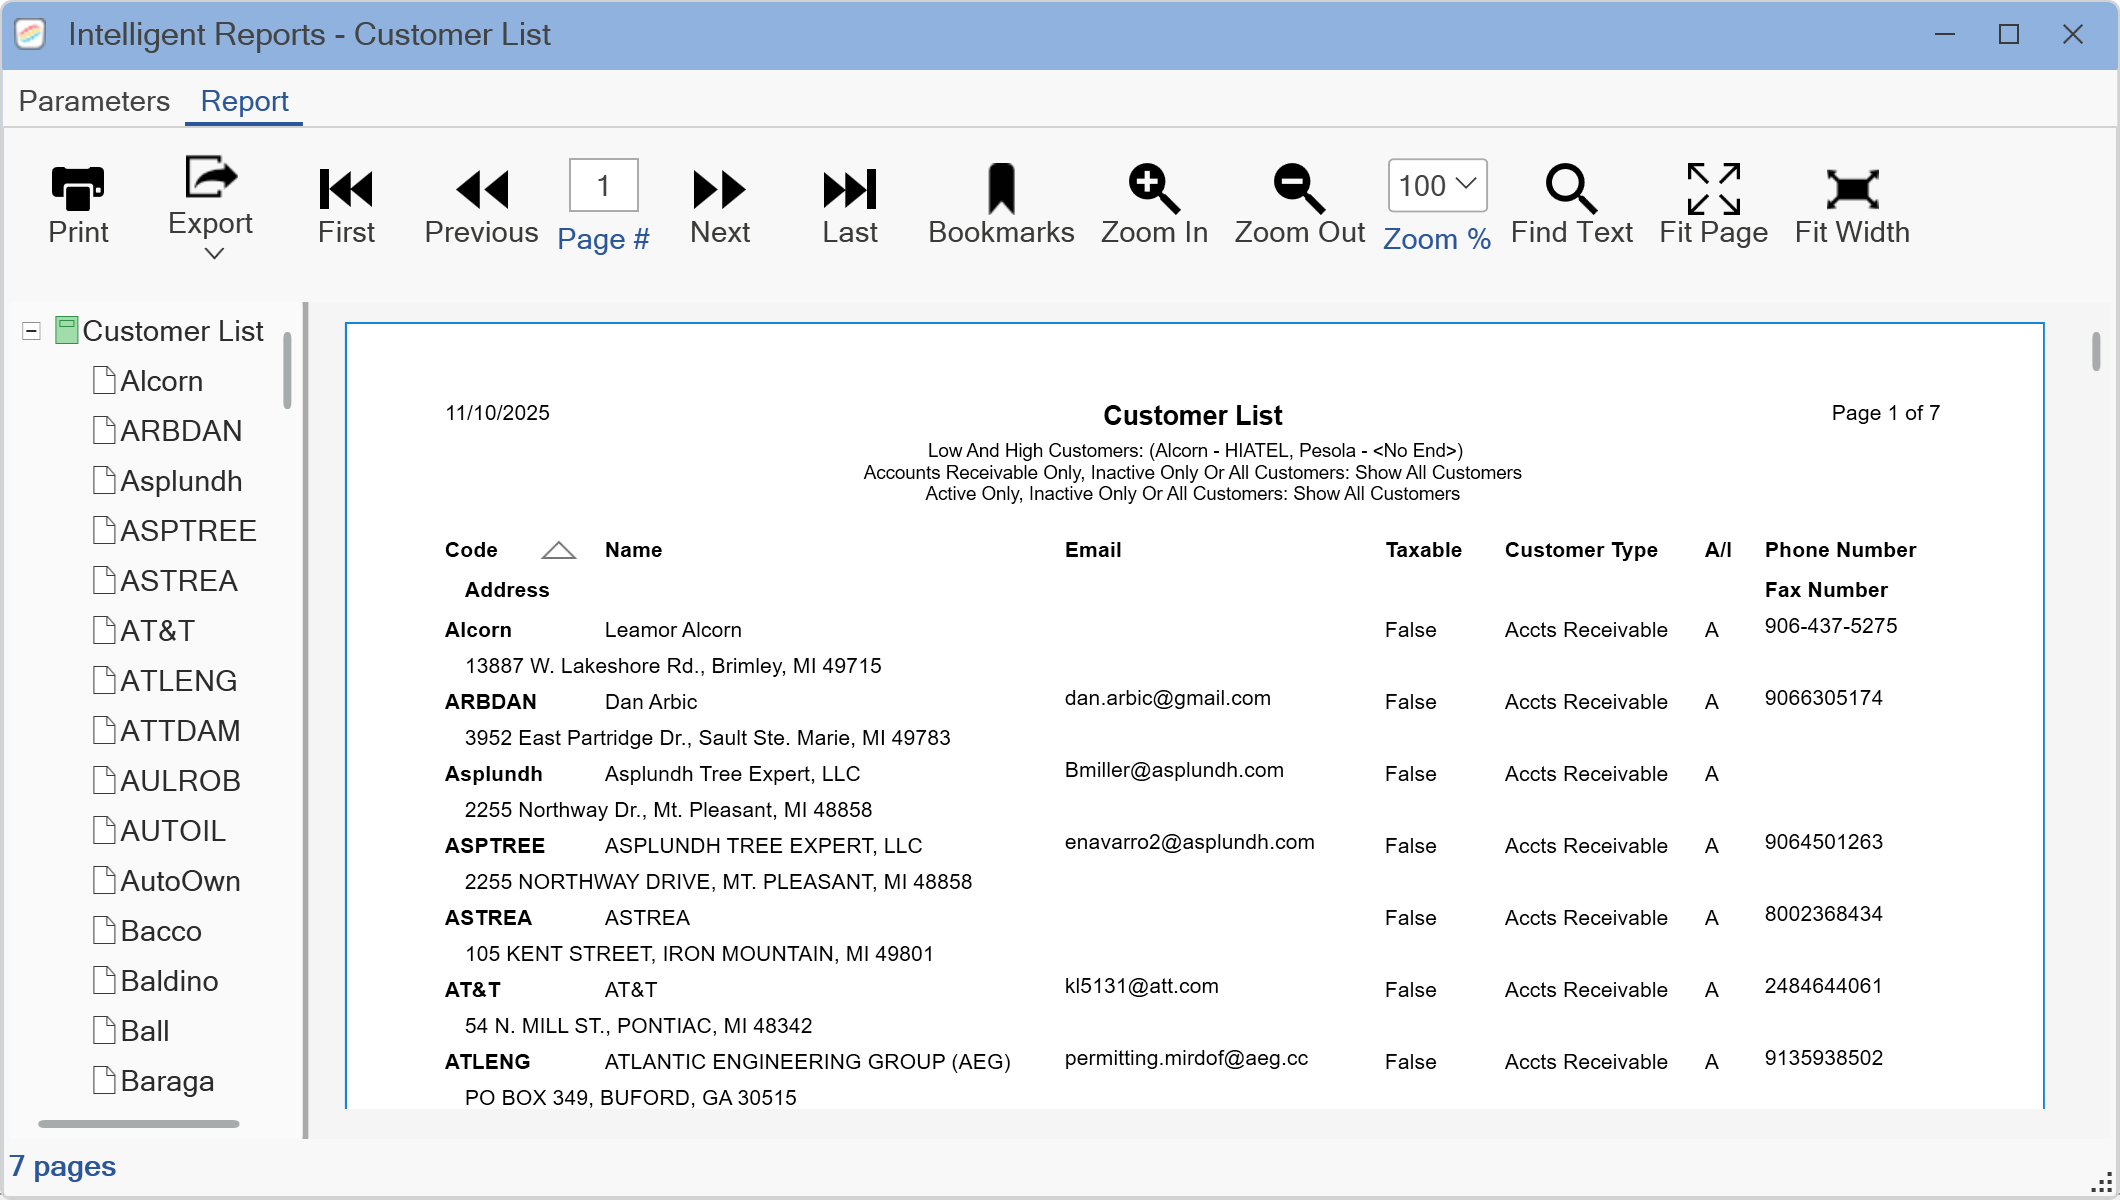
There is a button to print the report. Select your printer and any options that are needed for your printer. Then click the Print button. The Export button will allow you to save the report in PDF, Excel, comma separated values, Microsoft Word, or Rich Text Format.
NOTE: Printing reports does not update any of the data in your files, so you may run the reports as often as you wish.
There are Navigation buttons (First, Previous, Next, and Last) to move from page to page. A Bookmark button to show or hide a Bookmark column on the left-hand side of the window. There is also a Zoom in, Zoom out, and Zoom Percentage buttons for displaying the report. A Find Text button will show a field at the bottom of the report to key in text to locate a specific item in the report. This button has features that can be specified to help find isolated texts in your report. A Fit Page and a Fit Width button quickly shows the page or maximizes the page to your window size.
Once you have clicked the Run Report button, you can click the Parameters Tab to go back to the parameter options window and select new parameters and then rerun this report without exiting or going back to Pro Fund Accounting's report menu item. To see how the new settings appear on the printed report, click the Report Tab at the top of the window.
If you decide you do not want a report that you have already selected, click the X in the upper right corner of the window, which will return you to the available reports list.
Click on the X in the upper right corner of the window to close the Report Center window.